It's a pretty exciting time to be tinkering with technology, especially when you think about all the cool stuff you can do with small, capable computers like the Raspberry Pi. You know, these little devices are truly wonderful for bringing your creative ideas to life, particularly when it comes to setting up gadgets that talk to each other and do things around your home or even out in the world. Being able to reach out and control these creations from wherever you happen to be is, well, just a little bit like magic, isn't it? That kind of remote access is what makes so many interesting projects actually possible, giving you the freedom to manage things without having to be right there in front of them.
When you're building these sorts of internet-connected things, getting a secure way to talk to your Raspberry Pi is really important. This is where something called SSH comes into play. It stands for Secure Shell, and it's basically a very safe way to connect to another computer over a network, even the internet, and tell it what to do. Think of it as a private, protected pathway that lets you send commands and get information back, all without worrying too much about prying eyes. So, it's pretty much the go-to method for anyone who wants to manage their Raspberry Pi without plugging in a keyboard and screen every single time.
Using SSH with your Raspberry Pi opens up a whole world of possibilities for what you might call "Internet of Things" or IoT projects. You could be making a smart home system, setting up sensors to keep an eye on things, or even building something that helps with a hobby. The ability to access your little computer remotely means you're not tied down, and that, in a way, really expands what you can dream up and then actually build. It truly makes those imaginative ideas feel a lot more within reach, wouldn't you say?
Table of Contents
- Getting Started with SSH on Your Raspberry Pi
- Why Use SSH for Your IoT Creations?
- What Kinds of IoT Projects Can You Build with SSH?
- How Do You Keep Your SSH Connections Secure?
- Common SSH Challenges and Simple Solutions
- Beyond the Basics - Advanced SSH Tips
- The Future of Remote Control in IoT
- Making Your IoT Dreams a Reality
Getting Started with SSH on Your Raspberry Pi
Setting up SSH on your Raspberry Pi is, honestly, a pretty straightforward process, but it's a very important first step for any remote project you might have in mind. First things first, you'll want to make sure your Raspberry Pi's operating system, which is usually something like Raspberry Pi OS, is all set up and ready to go. This means you've got it installed on a memory card and it's booted up, perhaps connected to a screen and keyboard for this initial part. You know, you can typically enable SSH right from the graphical interface or by using a command line tool if you prefer that way of doing things. It's a setting that's usually tucked away in the configuration options, and once you flip that switch, your little computer is ready to listen for remote connections.
Initial Setup for ssh raspberry pi iot projects
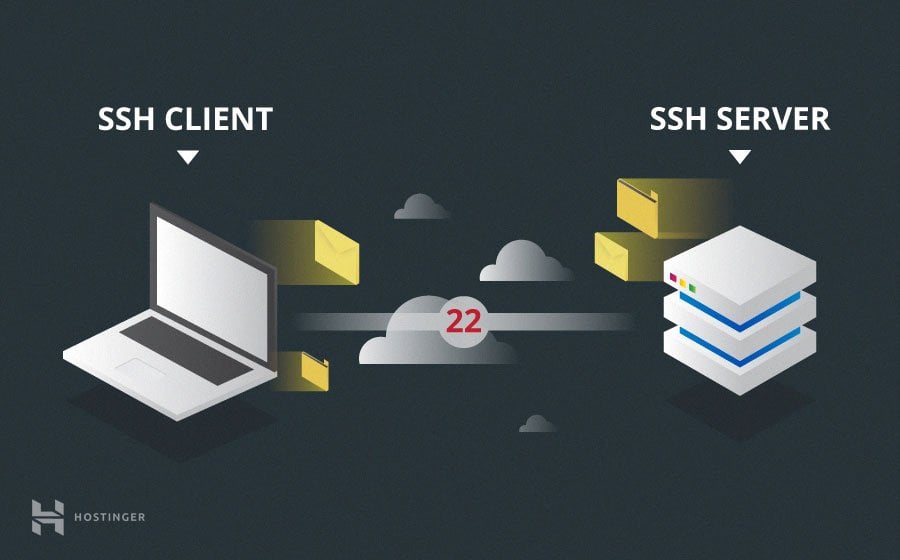
For your ssh raspberry pi iot projects, getting the initial setup right is pretty important. After your Raspberry Pi is running, you'll need to open up a terminal window on it. Then, you can type in a command like `sudo raspi-config`. This brings up a menu where you can change various settings. You'll want to look for an option that says "Interface Options" or something similar. Inside there, you'll find the choice to enable SSH. Once you select it and confirm, the SSH server component starts running on your Raspberry Pi. This means it's now listening for incoming connection requests. You know, it's a bit like opening a specific door on your computer so that other computers can knock and ask to come in, but only if they have the right key or password. It's really that simple to get the basic listening part going, which is rather nice.
After you've enabled SSH, you'll also want to find out your Raspberry Pi's network address, its IP address. You can do this by typing `hostname -I` into the terminal. This string of numbers, like "192.168.1.100," is what you'll use from another computer to actually connect to your Pi. So, if you're on your laptop, you would open its terminal or command prompt and type something like `ssh pi@your_pi_ip_address`, replacing "your_pi_ip_address" with the numbers you just found. The "pi" part is the default username for a Raspberry Pi. Then, you'll be asked for a password. Once you type that in correctly, you'll see a command line prompt that looks just like the one on your Raspberry Pi, but you're controlling it from afar. It's actually a pretty cool feeling to do that for the first time, to be honest.
- Kaleigh Hartung
- Haerin Erome
- Melanie Renee Family Of 11 Income Net Worth
- Is Bill Oreilly Sick
- Buddy Hackett
Why Use SSH for Your IoT Creations?
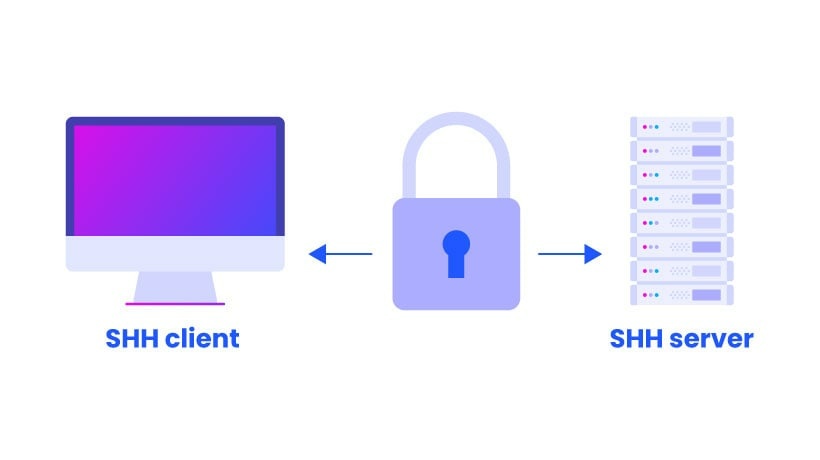
You might be wondering why SSH is such a big deal for your IoT creations, especially when there are other ways to interact with a computer. Well, the main reason, and it's a very good one, is security. When you're sending commands or getting information from your devices over a network, you really want to make sure that no one else can snoop on that conversation or, worse, take control of your device. SSH provides a secure, encrypted tunnel for all that communication. It scrambles the data as it travels, so even if someone were to intercept it, they wouldn't be able to make any sense of it. This is quite different from older, less secure methods that send information in plain text, which is a bit like shouting your secrets across a crowded room.
Security Benefits for ssh raspberry pi iot projects
For your ssh raspberry pi iot projects, the security benefits are, honestly, pretty significant. First off, as I mentioned, all the data going back and forth is encrypted. This means your commands, any passwords you type, and the output you receive are all protected from being read by unauthorized people. This is a huge plus, especially if your IoT device is doing something important, like managing a door lock or collecting sensitive data. Secondly, SSH uses strong authentication methods. This means it's very good at making sure that only you, or someone you've given permission to, can actually connect to your Raspberry Pi. It checks identities very carefully, making it much harder for someone to pretend to be you and gain access. So, it's not just about hiding the information; it's also about making sure the right people are talking to the right machines, which is actually rather important for peace of mind.
Another nice thing about SSH is that it helps prevent what are called "man-in-the-middle" attacks. This is where someone tries to secretly intercept and relay communications between two parties who believe they are communicating directly with each other. SSH has ways to verify the identity of the server you're connecting to, so you can be reasonably sure you're talking to your own Raspberry Pi and not some imposter. This layer of verification is pretty valuable, especially when your devices might be out in the open or connected to public networks. It adds a good deal of confidence to your remote interactions, which, you know, makes a big difference when you're relying on these connections for your projects. It’s definitely a solid choice for keeping things safe.
What Kinds of IoT Projects Can You Build with SSH?
With SSH as your reliable remote access tool, the types of IoT projects you can build with a Raspberry Pi are, well, pretty diverse and exciting. You're no longer limited to just projects that you can control with a screen and keyboard directly attached. Instead, you can have your little computer sitting quietly in a corner, doing its job, and you can check in on it or give it new instructions from your phone, laptop, or any other computer, really, from almost anywhere with an internet connection. This freedom opens up a lot of creative avenues, allowing you to put your Pi in places that might be inconvenient for direct interaction, like inside an appliance or high up on a shelf, which is kind of neat.
Home Automation with ssh raspberry pi iot projects
When it comes to ssh raspberry pi iot projects, home automation is a very popular area. You could, for instance, set up your Raspberry Pi to control your lights, adjust your thermostat, or even open and close your blinds. With SSH, you could be sitting at work, or even on vacation, and still connect to your Pi to turn off a light you forgot, or make sure the heating is on before you get home. You might write a simple script that checks the time and then sends a command to a smart plug connected to your Pi, and then you use SSH to upload that script or make changes to it. This means you don't need to pull the Pi out from behind the TV to update its programming. It's really about making your home a bit smarter and more responsive to your needs, which is a pretty cool thing to do, I think.
Environmental Monitoring for ssh raspberry pi iot projects
Another very common application for ssh raspberry pi iot projects is environmental monitoring. You could attach various sensors to your Raspberry Pi – perhaps ones that measure temperature, humidity, air quality, or even soil moisture for your garden. The Pi would collect this data, and then, using SSH, you could log in from anywhere to see the current readings or even view historical data. For example, if you have plants that need specific conditions, you could set up a sensor in their pot, and then regularly check the moisture levels without having to physically go and inspect them. You could even set up alerts that send you a message if something goes wrong, all managed through your remote SSH connection. It's a pretty practical way to keep an eye on things, and it gives you a lot of control over your surroundings, in a way.
How Do You Keep Your SSH Connections Secure?
While SSH itself is built with security in mind, there are still some very important steps you should take to make sure your connections are as safe as they can be, especially when you're dealing with devices that might be accessible from the internet. Just enabling SSH is a good start, but it's not the whole story. You know, thinking about security early on in your ssh raspberry pi iot projects can save you a lot of headaches later on. It’s like putting a good lock on your front door; you wouldn’t just leave it open, would you? So, applying a few extra layers of protection to your SSH setup is always a smart move, and it's actually not too difficult to do.
Public Key Authentication for ssh raspberry pi iot projects
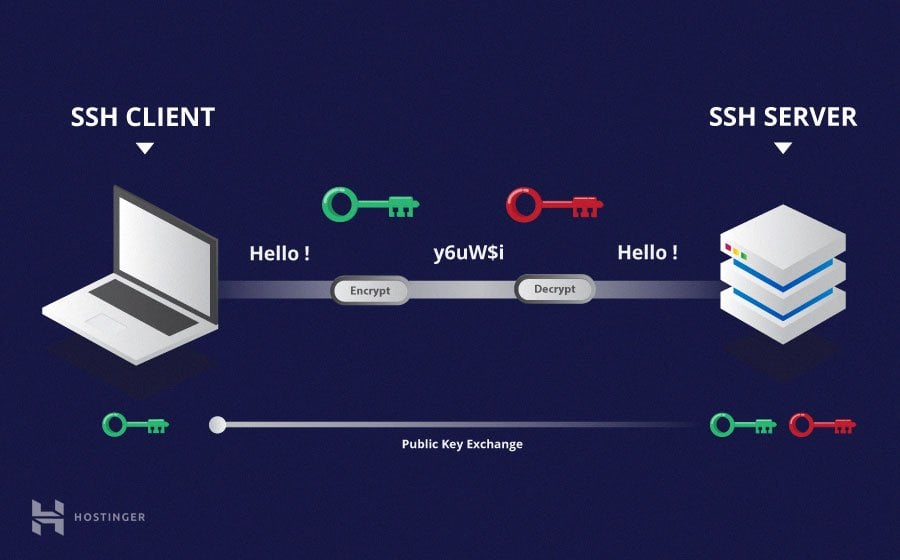
One of the best ways to keep your ssh raspberry pi iot projects secure is to use something called public key authentication instead of just passwords. This is a much stronger method of verifying who you are. Instead of typing a password every time, you generate a pair of special digital keys: one is called a public key, and the other is a private key. You put the public key on your Raspberry Pi, and you keep the private key safe on your own computer. When you try to connect, your computer uses the private key to prove to the Raspberry Pi that it's really you. The Raspberry Pi then checks this against the public key it has. This method is much harder for someone to guess or steal than a password, and it means you don't have to send your password over the network, which is a very good thing. It's pretty much the gold standard for SSH security, you know, and it's worth the little bit of effort to set up.
Setting up public key authentication involves a few steps, but it's not overly complex. On your local computer, you'll use a command to generate these key pairs. This creates two files, one ending in `.pub` (that's your public key) and the other being your private key. You then copy the public key file to your Raspberry Pi, usually into a specific directory within your user's home folder. After that, you can configure SSH on your Raspberry Pi to only accept connections using these keys, effectively disabling password logins. This makes it much more difficult for someone to try and brute-force their way in by guessing passwords. It's a pretty significant security upgrade for any of your remote devices, and it gives you a lot more confidence in your connections, which is really what you want, isn't it?
Changing Default Passwords for ssh raspberry pi iot projects
Another very important step for securing your ssh raspberry pi iot projects is to change the default password for the 'pi' user on your Raspberry Pi. When you first set up a Raspberry Pi, the default username is 'pi' and the default password is 'raspberry'. This is, honestly, a well-known combination, and leaving it as is makes your device very vulnerable to unauthorized access. Anyone who knows this default can potentially log into your Pi if it's accessible over the network. So, the very first thing you should do after enabling SSH is to change that password to something unique and strong. You can do this by simply typing `passwd` into the Raspberry Pi's terminal and following the prompts. It's a simple change, but it makes a really big difference in your device's security, actually. It’s a bit like changing the locks on a new house; you just do it.
A strong password should be long, combine uppercase and lowercase letters, numbers, and symbols. Avoid using easily guessable things like your name, birthdate, or common words. The longer and more random your password is, the harder it is for someone to guess or crack it. While public key authentication is superior, having a strong password for initial setup or as a backup is still a good practice. It's basically a fundamental step in making sure your Raspberry Pi is not an easy target for anyone looking to mess with your IoT setups. So, don't skip this part; it's genuinely important for keeping your projects safe, and it really doesn't take much time at all.
Common SSH Challenges and Simple Solutions
Even with SSH being pretty reliable, you might, every now and then, run into a few little hiccups or challenges when you're trying to connect to your Raspberry Pi. It's a pretty common experience for anyone working with remote connections, so don't feel bad if it happens. These issues can range from simply not being able to connect to strange error messages popping up. The good news is that most of these common problems have, well, pretty simple solutions, and knowing what to look for can save you a lot of time and frustration. It's all part of the learning process, you know, and figuring out these small things actually helps you understand the system a bit better, too.
Connection Woes in ssh raspberry pi iot projects
One of the most frequent connection woes you might encounter in your ssh raspberry pi iot projects is simply that the connection gets closed or refused. This can happen for a few reasons. First, always double-check that your Raspberry Pi is actually powered on and connected to the network. Sometimes, the simplest things are the easiest to overlook. Second, make sure you're using the correct IP address for your Pi. IP addresses can sometimes change, especially if your router assigns them dynamically. You can usually check the current IP address on your Pi itself or through your router's settings. Also, confirm that SSH is indeed enabled on your Raspberry Pi. If it was accidentally turned off, or if you're using a fresh installation, it might not be running. A quick check with `sudo systemctl status ssh` on the Pi can tell you if the SSH service is active. If it's not, you might need to restart it or enable it again. These are usually the first things to look at when a connection just won't go through, and they often solve the problem, which is pretty convenient.
Another common issue could be related to firewalls, either on your Raspberry Pi or on your network router. A firewall is like a digital bouncer that decides what traffic can come in and go out. If your firewall is blocking SSH connections, you won't be able to get through. You might need to adjust your router's settings to "port forward" SSH traffic to your Raspberry Pi if you're trying to connect from outside your home network. Similarly, if you've set up a firewall on your Raspberry Pi itself (like `ufw`), you'll need to make sure it's configured to allow SSH connections on port 22 (which is the standard SSH port). Checking these network and firewall settings is often the key to resolving those stubborn connection problems, and it’s something you get better at with a little practice, honestly.
Beyond the Basics - Advanced SSH Tips
Once you're comfortable with the basic SSH connection for your Raspberry Pi, there are some more advanced things you can do that are, well, pretty useful for more complex IoT setups. These tips can help you get even more out of your remote access, making your projects more flexible and sometimes even more secure. It's a bit like learning to drive a car and then discovering all the extra features it has that make the ride smoother or more efficient. These advanced SSH techniques can really open up new possibilities for how your Raspberry Pi interacts with other devices or services, which is pretty neat, actually.
SSH Tunnelling for ssh raspberry pi iot projects
One particularly powerful feature for ssh raspberry pi iot projects is something called SSH tunnelling, sometimes also known as port forwarding. This allows you to create a secure, encrypted tunnel through your SSH connection to access services that might not otherwise be directly reachable or secure. For instance, if you have a web server running on your Raspberry Pi, but you don't want to expose it directly to the internet, you can use an SSH tunnel. This would let you access that web server from your local computer as if it were running right there, but all the traffic goes securely through your SSH connection. It's a very clever way to access things securely without making them publicly available, which is really quite handy for testing or for services that only you need to see. You know, it adds a really good layer of privacy and control to your remote interactions.
There are a couple of types of SSH tunnelling: local and remote. Local forwarding is when you connect from your local machine to a port on the Raspberry Pi, and that connection is then forwarded to another service. Remote forwarding is the opposite: you allow a remote computer (your Pi) to connect to a service on your local machine. These techniques are incredibly useful for getting around firewalls, accessing internal services securely, or even creating a simple VPN-like setup for specific applications. It takes a little bit of command-line magic to set up, but once you get the hang of it, you'll find it's an invaluable tool for your more sophisticated IoT endeavors. It really helps to extend the reach of your Raspberry Pi projects in a very safe way, which is something to consider, for sure.
The Future of Remote Control in IoT
Looking ahead, the role of remote control, particularly through secure methods like SSH, is only going to become more and more important for IoT devices, including those powered by Raspberry Pis. As we connect more and more things around us to the internet, the ability to manage, monitor, and update them from afar becomes not just a convenience, but a pretty essential requirement. The way we interact with these smart devices is constantly evolving, and having a reliable, safe way to communicate with them is, well, just a fundamental piece of that puzzle. You know, the possibilities for what these connected devices can do are really just beginning to unfold, and remote access is right at the heart of it all.
Scalability for ssh raspberry pi iot projects
For your ssh raspberry pi iot projects, thinking about scalability is also something to consider as you get more involved. What if you have not just one, but ten, or even a hundred Raspberry Pis deployed for various tasks? Managing each one individually can become, honestly, a bit of a chore. This is where SSH continues to be incredibly useful. You can write scripts that automate tasks across multiple devices, using SSH to connect to each one and execute commands. This means you can update software, collect data, or even reboot many devices with just a single command from your central computer. It saves a tremendous amount of time and effort, making it much more practical to manage larger deployments of IoT devices. So, it's not just for single projects; it's actually a very powerful tool for growing your network of connected things, which is pretty cool.
Making Your IoT Dreams a Reality
Ultimately, using SSH with your Raspberry Pi is a pretty foundational skill for anyone looking to build genuinely interesting and practical IoT projects. It gives you the freedom to place your devices where they're most effective, without being limited by physical access. It also provides that crucial layer of security, making sure your smart creations are doing what they're supposed to do, and only for you. So, whether you're just starting out with a simple sensor or planning a more complex home automation system, getting comfortable with SSH is a very worthwhile investment of your time. It truly makes those imaginative ideas feel a lot more within reach, and it’s a pretty empowering feeling to control things from afar, isn't it?
The journey of building IoT projects with your Raspberry Pi, using SSH, is one that's full of learning and creative problem-solving. Each project you take on, each connection you make, will teach you something new about how these systems work together. It's a very hands-on way to explore the world of connected devices, and it gives you a practical understanding of how things communicate in a secure way. So, keep tinkering, keep exploring, and keep using SSH to make your Raspberry Pi IoT dreams a concrete reality. There's a lot to discover, and it's actually quite a rewarding experience, to be honest.
Related Resources:
Detail Author:
- Name : Prof. Mayra Hermiston
- Username : qkilback
- Email : wwilliamson@yahoo.com
- Birthdate : 1994-04-13
- Address : 817 Senger Harbors Rutherfordfurt, SD 88559-8258
- Phone : 423.461.4450
- Company : Stamm, Kuphal and Collins
- Job : Automotive Technician
- Bio : Consectetur voluptas sint harum ut rem consectetur. Velit possimus ut aut minima reiciendis eos. Consequatur nulla unde et sint perferendis at.
Socials
linkedin:
- url : https://linkedin.com/in/bward
- username : bward
- bio : Suscipit quidem et autem recusandae deserunt.
- followers : 4037
- following : 1125
facebook:
- url : https://facebook.com/breanna1006
- username : breanna1006
- bio : Inventore nam animi doloremque pariatur ut dolor ut molestiae.
- followers : 3609
- following : 2028
tiktok:
- url : https://tiktok.com/@breanna_ward
- username : breanna_ward
- bio : Est velit libero sit sapiente. Id ipsam molestiae doloribus.
- followers : 4469
- following : 290
instagram:
- url : https://instagram.com/breanna_xx
- username : breanna_xx
- bio : Aspernatur rerum maxime culpa quod mollitia provident ratione. Veniam odit quidem velit.
- followers : 384
- following : 2018
twitter:
- url : https://twitter.com/breanna_real
- username : breanna_real
- bio : Eum ut quibusdam maiores ut dicta. Quidem omnis tempora unde vero et iure. Laudantium occaecati esse est.
- followers : 3165
- following : 1043
